homeaboutresourceslinkscontributorscontact
Showing posts with label claire. Show all posts

Thursday, 16 June 2016

Summer Exhibitions

For our AS students who are now back with us beginning their second year we set them a summer task to visit an exhibition! I've spent the morning compiling a list of suggestions (mostly London based) from my students and thought it might be handy to share with you all! I'm looking forward to attending the Royal Academy Summer Show next week as a trip for our students (Kirsty is attending too!) and I'm visiting Part 1 of New Designers. After those I'll need to start planning a few to visit over the summer. I've heard good things about Mona Hatoum at the Tate and am keen to check out Conceptual Art in Britain as well as Exhibitionism - if the Bowie exhibition at the V&A is anything to go by for an art/music collaborative show it's bound to be good!

GRADUATE SHOWS
Where: Business Design Centre Islington, London
Cost: £12 (in advance) £16 (on the door)
Where: Truman Brewery, London
Cost: Free

MUSEUMS & GALLERIES 


Where: Royal Academy, London
Cost: £13.50 or £10 with student card

Where: Tate Britain, London
Cost: £12 or £10.50 with student card

What: Mona Hatoum 
Where: Tate Modern, London
Cost: £16 or £14 with student card

Where: Tate Modern. London
Cost: £19 or £17

Where: Tate, Liverpool
Cost: £13.20 or £10.45 with student card

Where: Serpentine
Cost: Free

Where: National Portrait Gallery, London
Cost: free

Where: National Gallery, London
Cost: £10 or £5 with student card

Where: Saatchi Gallery, London
Cost: £20-22 or £18-20 with student card (it's cheaper to go Monday-Thursday + no student rate on Saturdays)

Where: Whitechapel, London
Cost: free

Where: Hauser & Wirth, Somerset
Cost: Free

Where: Hauser & Wirth, London
Cost: Free

Where: Shoreditch, London
Cost: £12-15 depending on which tour you take!

Let us know if you visit any of the exhibitions and share what you think with us + we'd love to hear any suggestions for exhibitions further afield!

- Claire 

Tuesday, 11 August 2015

3W: Andy Warhol


who: Andy Warhol 
what: Cats 
why: having recently become a proud owner to two beautiful cats I wanted to celebrate by adding some artwork to my walls that was cat related and I stumbled upon Andy Warhol's cat series! You can read more about the 25 cats named Sam and one blue pussy, here. I was completely unaware of them before and they make a great link for any students looking at animals for a subject matter as well as being a bit away from the norm for an Andy Warhol reference! Also if you too are into cats and art and happen to be in Amsterdam I fully recommend the Cat Museum, The Cat Cabinet, that's there! 

Friday, 7 August 2015

3W: Maxine Sutton


who: Maxine Sutton
what: print and embroidery
why: stunning combinations of colour, shape and pattern! This July she celebrated 5 years of having her own store down in Margate. This blog posts tells you all about the story of how she started to where the store is now - very inspirational!

Tuesday, 4 August 2015

3W: Crystal Wager


what: paper installations, drawing and printmaking 
why: neon colours! Her installations draw you in visually and then when you look deeper the connection between her drawn and print processes and the development into sculpture makes them perfect to show students how to evolve from a drawing in an exciting manner! 

Monday, 3 August 2015

3W: Eve O'Neill/Fforestfelt


what: needle felt sculptures 
why: spotted on country file, the work of Eve aka Fforest felt is truly lovely! She works with locally sourced wool as well as other items foraged from her surroundings in Wales such as feathers and lichen to needle felt beautiful sculptures of natural forms and animals. It's well worth watching the Country File episode if you can - it shows her whole process, including foraging! 

Friday, 26 June 2015

lesson idea: silhouettes

I'm currently doing a mini-portrait project with my year 7's for the end of term and we have been having some fun playing around with the starting point 'silhouette's' so I thought I'd share a few of the activities we have been doing! We started by creating a set of photographs so each student had a photo of themselves from a side view. From the photographs we made our initial silhouette. I got my students to create the silhouette by tracing around the outline of their figure onto tracing paper, cutting it out and then placing and cutting round it onto black paper! We then mounted them onto white cartridge!
Rather than just leaving it there though, I wanted to start to put more detail in! We are working up to creating a design on a ceramic tile so I wanted my students to create more layers of colour and more shapes to work with. We used grey paper to add sections of detail, focusing on things like hair, ears (if visible!) and clothing. I showed the students some examples of framed silhouettes too to inspire them to create a black paper-cut border.


Next we came back to drawing! We took the silhouettes out to our photocopier and I showed them how to create a positive/negative copy. The black areas are transformed to white enabling them to draw back into the silhouette shape. Working from their photograph they put back in the detail of their facial features, hair and clothing!
Then finally back out to the photocopier to create a second positive/negative copy this time reverting the image back to it's originally state! I also showed them how to do a one colour copy to liven it up a bit into some brighter colours! It's worth checking if your copier has this setting there's a whole range of colours to choose from - red, blue, yellow, orange, green etc. etc.

My students really enjoyed it and have made some exciting designs in preparation for our ceramic tiles! As always if you try out this technique we'd love to see what you and your students create!
- Claire 

Wednesday, 22 April 2015

digital: Canva and a happy third birthday here at I Heart Teaching Art


To celebrate our third birthday here at I Heart Teaching Art I've been playing around the online Graphic Software Canva. Earlier this week my partner went on a training course at work and afterwards he did not stop raving about it so I had to check it out and so far... I'm pretty impressed! The site allows you to make blog graphics, Facebook covers, posters and more in a matter of minutes! You can customise the fonts, colours and upload your own images into a selection of existing templates and they even have a ton of stock images which you can use if you don't have your own. 

Already I've come up with a few ideas of how it could used in the classroom...
  • Mocking up initial ideas with Graphic Students
  • Making beautiful things for classroom displays (but in much less time!) 
  • For those of you who are tutors and have to get your class to put together poster etc. for around school
  • If you run a blog, twitter, Facebook etc at school! Make some quick, stylish imagery! 

I can't believe it's been three years since we started the blog! I had fun looking back at the photo's we took when we first put the site together and chucked in a fun one of me and Kirsty having a bit of a giggle in B&Q last year whilst collecting paint for the end of year exhibition! We've had so much fun  with the blog and we're always overwhelmed with the positive feedback that we get from our readers! Thank you! 

- Claire 

Thursday, 5 February 2015

classroom displays: colour theory meets art history


Ever since I got a Tate timeline I've wanted it displayed in my classroom but I wanted it to have a bit more substance than just a stand alone piece. Additionally this academic year I changed workplace wanted to have a fresh set of display pieces to put up so that I knew at least one board could be transformed as soon as moved in. Although I've taught fine art or art and design as part of my timetable over the last 5 years I've been based in and primarily taught Graphics or Textiles so I didn't have many display items ready to go! One of the things I enjoyed about Textiles was the emphasis on colour palettes so I decided to create a mash up of colour theory and art history and so my 'colour theory meets art history' board was created! I selected artists from across the Tate timeline and collated an example of their work (title and dates included), defined their colour palette and the art movement they were associated with. 

I created the sheets in Photoshop which was great as I could use the colour picker tool to take colours straight from the painting and drop them into my colour palette! I created 25 examples altogether and to display them place them in chronological order with the Tate timeline running across the middle! I think it's made a pretty good display board and I've found my students interact with it well either looking for examples of colour or asking questions about artwork that we may not have otherwise covered in class! Here it is in all it's glory...

Tuesday, 9 December 2014

lesson idea: Christmas

my tree!

When it gets to the end of term I find there are mixed opinions about the value of doing something festive with students in class, for Art though I feel as though there are ways that it can link into current projects or utilise and develop skills for the subject! For example, I'm currently working on a altered book project with my year 9 class and have been developing skills with paper manipulation so for our last lesson of the term we are going to create 3D paper ornaments following these instructions to start. The students will be having fun (hopefully!) but also learning some great construction skills for their current project! So on that note here's a round up of some of the awesome Christmas craft instructions and downloadables I've found this year...
There's more on our pinterest board!
Happy Christmas- Claire 

Monday, 17 November 2014

technique: drawing with thread pva


Just a quick post to share my excitement with this technique! I love the idea of working with thread but not every student is going to be into the idea of sewing so if you've got any students like this get them to give this a go! 

Drawing with thread & pva
what you need: 
- embroidery floss (I used black but you can use any colour!)
- pva glue
- a flat plastic surface (I used a paint palette)
- glue stick or brush 

method:
1. Pour a layer of pva into your palette (approx. 5mm thick) - you can pour and tilt your palette or push the glue around to make a particular shape that suits your drawing or go right to the edges for an even shape
2. Cut stripes of thread to work with - if your using embroidery floss experiment with separating the 6 strands into different thicknesses so that you can get a range of line in your drawing
3. lay the strands thread into the pva to create your drawing - if you can't get them in the right position use your glue stick or brush to push them into place. You can also create loose threads around your drawing by hanging them outside of the glue area! 
note: the threads will start to sink into the pva and will look faint but the glue will dry clear so do not worry! 
4. Once you have completed your drawing leave to dry! This could take 24-48 hours depending on the thickness of the glue!
5. Once completely dry carefully peel your drawing away from the palette to reveal! 

extension: you could work into your drawing with machine or hand sewing OR cut away areas of glue to leave loose threads 

tip: I used a slightly dirty paint palette (you could paint the palette before hand if you wanted more control over this aspect) - the pva will pick up the paint from the surface which can add an interesting effect to your drawing, if you want it to dry clear use a super clean one! 

As always we'd love to see anything you create if you followed our instructions!
- Claire 

Monday, 10 November 2014

lesson idea: monoprinting


I've recently started teaching in an 11-18 school which is a whole new experience as my life as a teacher has always been 16+. I'm really enjoying it and as a new employee of course shortly after joining the probationary period first lesson observation popped up! Year 7... oo! My class are currently working on a natural landscape project and we are working up to creating a collaborative wall hanging. Fortunately for me my lesson observation fell when we were about to start mono printing!

As it was my classes first time printing I wanted to ease them into and ensure that they got some good results before we developed and moved on to more drawing based approaches so I went on a nice walk in the woods and gathered some leaves to prepare for my lesson...

starter: teacher led demonstration. I demonstrated two techniques 'using leaves as a resist' and 'printing with leaves'. It's a great chance to cover the do's and don'ts for mono printing - demonstrate what happens if you lean on the plate, if you put too much ink on and if you put an inky roller on the desk! 

main:  I set the students the task of creating 4 prints 

- relief print using leaves on paper
- relief print using leaves on fabric
- leaf print on paper
- leaf print on newsprint

I got my students to work in pairs so that they could work together to go through the steps, it meant they were able to troubleshoot any problems they had and enabled me to get around to see each individual as they were able to ask each other rather than me constantly! I also made sure there were instructions taped to each table incase they got stuck! 


extension: over printing e.g. print the leaves back into a resist print 

plenary: Class discussion and recap! We re capped the 'how to' for each technique and discussed problems we encountered (such as leaves tearing, too much ink, too little ink) and the how the inked worked on different surfaces!  Also they are gonna need a nice chunk of time to get cleaned up and get the classroom back in shape! 

The following lesson we moved onto trace mono printing so that the students could utilise their drawing skills and I found it so helpful that they already new how to set up the plate! The final pieces they are creating for the project will now be a combination of all 3 techniques!

As always if you have a go at this lesson, or have done something similar we'd love to see it!
- Claire 

Wednesday, 5 November 2014

lesson idea: Paper Cutting

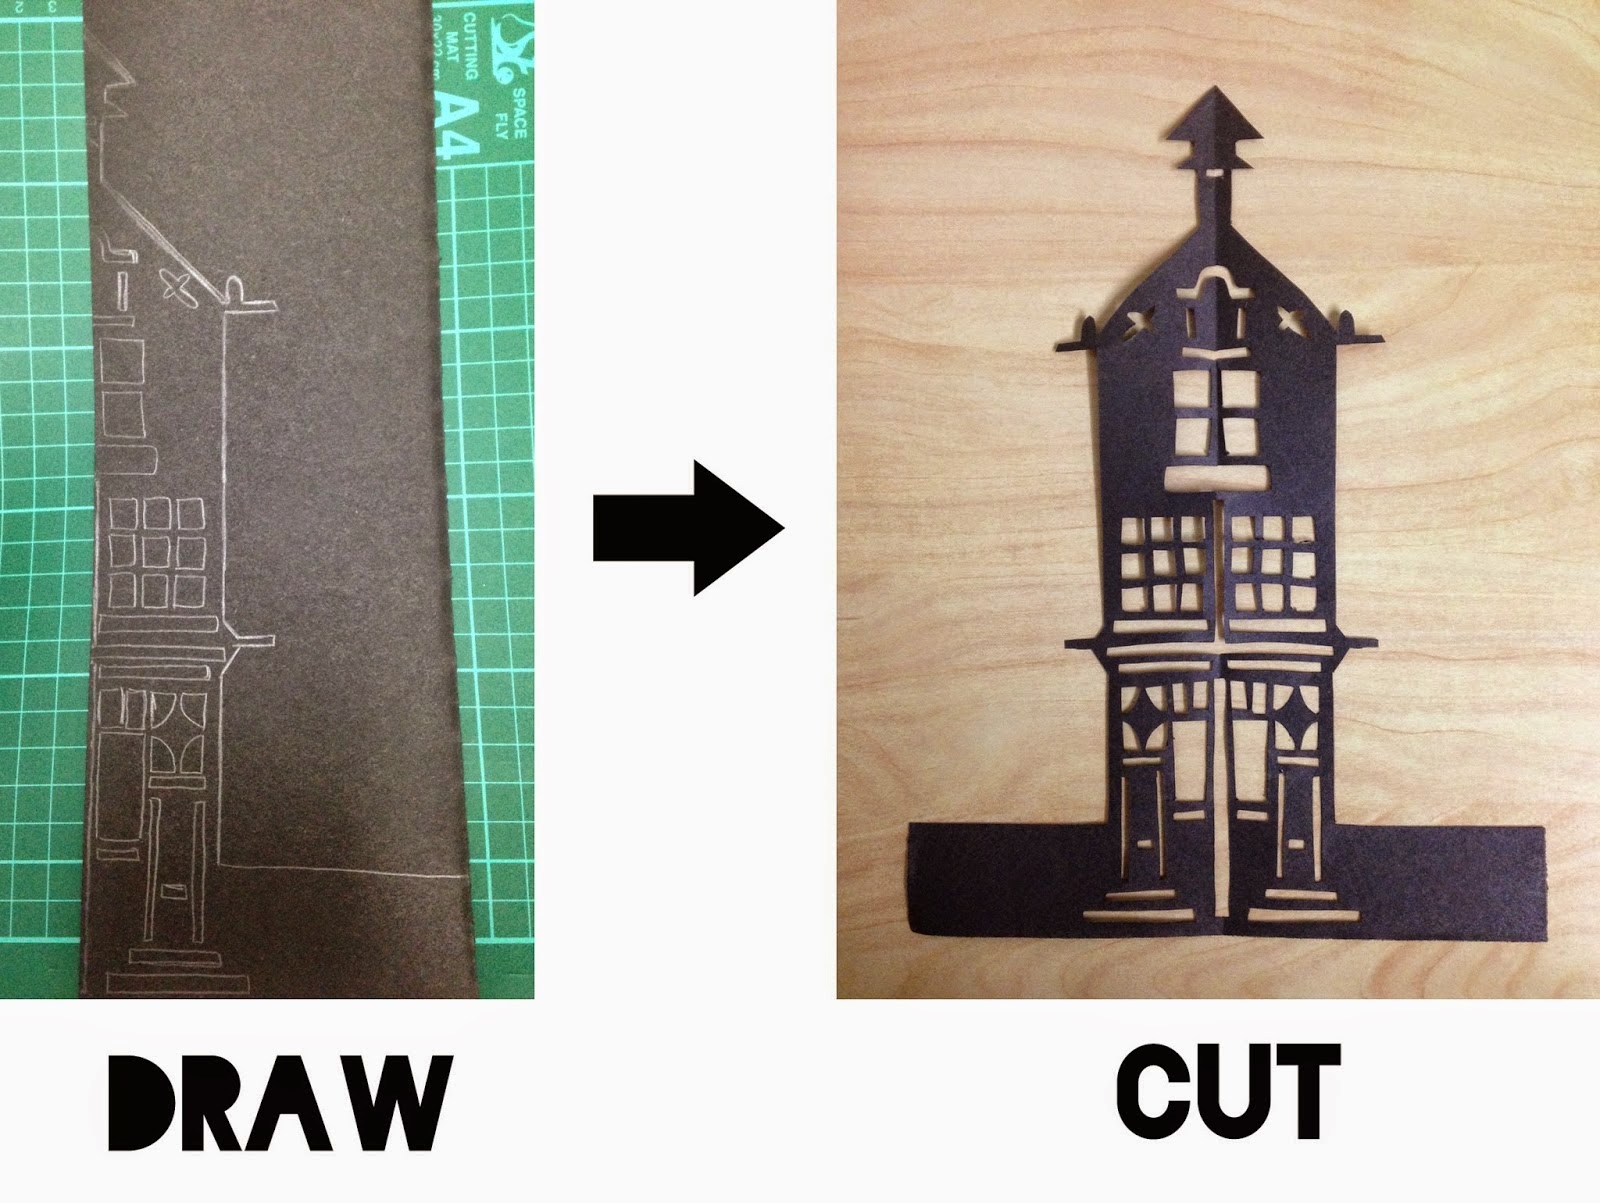
This morning I had an awesome lesson with my year 9's so I thought I would share it over here on I heart teaching art! We've just started an altered book project and to ease them in to manipulating paper I wanted to start 2D to build up their confidence. Both me and Kirsty have done a lesson on paper cutting recently but her's was aimed at year 12 - it's a great lesson that can be aimed at a range of levels you just need to play around with the level of skill and subject matter. We focused on buildings for our cuttings. 

Starter: We watched a quick 4 minute clip of Rob Ryan talking about his work (you just can't do paper cutting without referring to him can you?! and the students loved it). I gave the students a very brief worksheet to fill in as we watched the video and afterwards discussed their opinions of the art work and how it had been created.

video clip: This is the clip that I selected, but there are a ton of different videos so you can easily adapt this to select a clip more relevant to your class! 


Worksheet: download a copy, HERE.


Demonstration: I then demonstrated to the group how to create a symmetrical paper cut by folding the paper in half and drawing one half of the image. I found it was good at this stage to go over 'anchoring' the cut out areas and colouring in the sections that you wanted to cut out to make sure that it worked. 


Main: Students will design and cut their own design based on buildings. I also provided my class with a range of examples (see below) so that they could get inspiration and if needed, copy sections of existing designs - for me this lesson was about learning the technique more than creating the design, that will come later! Once the students have got started it's best to go round and check designs, give guidance on how to cut and if there are any mistakes a few quick 'cheats' with some tape to fix it can always help!

Extension: For my higher ability learners, once they completed a paper cut (in super speedy time!) we discussed ways to make their existing design more complex OR began a second cutting this time working with a flat design rather than symmetrical and for the very advance students introduced typography (must be done back to front!) and shapes surrounding the design.


Plenary: If you have access to an old OHP then you can celebrate (woo-hoo!) cause it now has a super cool function! We gather around the OHP to exhibit our final paper cuts and as each student showcased theirs we ooo'd and aahh'd (as its bonfire night) and they discussed either a pro or con of paper cutting!

If you do have a go at this lesson as always we'd love to see the results!
- Claire ❤ (& Kirsty as I pinched some of her resources for my lesson and this post!) 

Saturday, 5 July 2014

3W: Helen Anslow

what: embroidery
why: This work was shared with me by a student who is a cousin of the artist who thought I would like the work and I was absolutely mesmerised by it. I'm a huge fan of anything anatomical and textile related so they really appealed to me! I also love that each heart that's created has a concept behind it which Helen has begun to share on her blog. 

Thursday, 12 June 2014

End of Year Exhibition


These are a selection of images of the work on display, if you'd like to see more please click HERE

I imagine there's plenty of us art teachers out there at the moment who've just endured the craziness that is the end of May/beginning of June marking, moderators and end of year exhibitions! My craziness is all over now, phew! So I thought I'd share some of the incredible work my students have created this year. To give it a bit of context, this year I have been on a one year maternity cover as curriculum manager for Textiles. I feel extremely lucky to have spent a year only teaching Textiles and to have solely taught our A2 students. It has been an absolute pleasure and I feel very proud of what my students have achieved.  As a newbie to the college I also thought why not challenge myself and so in collaboration with my students put on the first ever Fashion Show as part of the exhibition! It was brilliant fun and a great way to showcase the work in an appropirate context. It was also a lovely activity to end on with the students as it was a real celebration. You can have a look at some of their wonderful work in the video below... 


Hope you've enjoyed having a look at the work and if you are in the area it's open to the public till 19th June - you can find details of the exhibition, here and see a selection of work from the whole art department, here
- Claire 

Friday, 6 June 2014

Review: Debbie Bliss Homeware

During half term me and Kirsty received a rather exciting email from the wonderful Debbie Bliss. We have always been big fans of her knitwear and yarn ranges and I had met Debbie a few years back at a blogging event for Christmas Jumper Day with Save The Children so we were certainly intrigued when her email appeared in our inbox. Anyway it turns out that over at Debbie Bliss they have been busy creating a homeware range so they sent us over a few bits and pieces and it certainly does not disappoint! We had a bit of fun in the photo studio at work photographing them and here's our favourtie shots of the stuff we got... 


These pieces are from the stitches collection. I think our absolute favourites are the mugs which don't just have beautiful illustrations of knit stitches but include the pattern itself on the inside of the mugs and of course are perfect for us teachers to pop a hot (or cold in Kirsty's case) drink in of a break time! We also enjoyed matching them up with some of the Debbie Bliss pieces I've knitted myself...


The monochrome collection is just as delightful as the stitches collection, we particularly love the knitting aid pieces. The apron is brilliant! We're not going to lie it took us a moment to work out why half of it appeared to be upside down, until we popped them on...a-ha! You can read it when you're wearing it! The information includes everything from knitting needle gauges to washing care instructions and even includes a couple of handy rulers (both inches and cm). This week we were hanging our summer exhibition so the pouches on our aprons came in very handy for storing hammers, nails, measuring tapes and the like whilst we were clambering up and down ladders! We also loved the London Brick Knitting Needle Holder, personally I find knitting needles a pain to store and display and this holder makes it all better and much more beautiful. 

We hope you've enjoyed checking out this beautiful collection, as a knitter I am completely in love with these collections I would wholeheartedly recommend  them as the perfect gift for your knitting friends! You can check out the full homeware range, HERE

Enjoy! 
- Claire and Kirsty 

Wednesday, 4 June 2014

Review: Graduate Fashion Week, My Favourites

I love this time of year, time to visit all of the graduate shows with my students and get them excited and inspired about their future prospects! Yesterday I went to Graduate Fashion Week, which has relocated this year to the Truman Brewery (which I loved! a much more exciting venue) to check out this years fresh young talent and to see the International Catwalk Competition catwalk show. I had a brilliant time and these were some of my favourites from the show...


Keziah Newlove - her blog has great progress shots

Laura Baker - loved her illustrations

Ainslie Mackie - she had a beautiful portfolio 


I guess I have a bit of a thing for knitwear! 
- Claire